Monday 10 June 2013

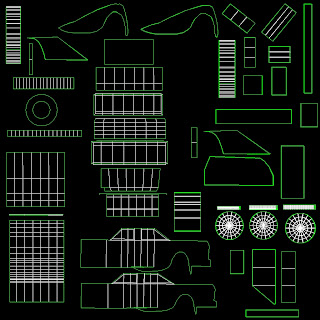
Textures


Car Fig. 1
Car Fig 2 
 Car Fig 3
 Car Fig 4
Car Fig 5


The above images were all used to make the Car (Fig 5)


All the above images were used in the creation of the Gate.


All the images above were used to create the Lamp post


The images above were used to make the Table.

Saturday 8 June 2013

My Final thoughts

During this module I have learned how 3-D assets are made in 3-D modelling software and imported into game engines.  Aside from the basics I have been taught splines, UVW unwrapping and model texturing.  All of these will be very useful to me in later modules on this course.  I like to think that I have fully understood the basics of 3-D modelling and that I will have a greater head start when it comes to using 3-D modelling software again.  I am very pleased with how my models were built, I am especially pleased with the flail mace as it was a very complex model to make using advanced geometry.  Besides from modelling have learned a great deal about UDK.  I have found out how levels are built from scratch using the builder brushes, how to texture the geometry and how static meshes and postproduction effects such as lighting and particles are added into the level.  I have found the unreal development kit to be surprisingly easy and straight forward to use.  I have recently downloaded it for my own personal use and I may use it in my free time.  Other things I have learnt have been creating and adding my own sound effects, my 3-D models and textures.  The models I created were a car, gate, table and lamp posts.  As I have said before I am satisfied with their development and deployment into my UDK project.  One of the many challenges I faced was the saving and reloading of save files, I used the same versions of the development kit on two separate computers and that created the problem of my save files not cooperating with the current version of the software.  This meant I couldn't save so to counteract this I selected everything in the saved file and transferred it to a new file.  I did this multiple times during the course and it worked wonders for my project and the deadline.  Overall I have enjoyed this challenge and I will definitely employee these lessons for my future use of 3-D modelling software and the unreal development kit.

My models in UDK

 Below are some screenshots of the 3-D models that I made in 3DS Max and imported into UDK.

Car
 Car from the back.

Car from the front. 

Lamp posts
 Lamp posts leading up towards the warehouse.

Lamp posts along the road and pavement. 

Lamp posts outside the houses.

Gates
Gate on the right side of level. 

Gate on the left side of level.

Table
Table inside a dark room on the top floor of the warehouse.

Monday 3 June 2013

3D model evaluation: Car

For this model I decided to base it of a drawing that I completed from a drawing module two terms previous.  At the beginning I created a plane in the geometry tab and I applied my drawing from Photoshop onto it and stretched the plane to fit my specifications.  I then used the spline tool to draw around my reference image to form the bodywork of the model.  Once I had drawn it I converted the shape to an editable poly and extruded the shape to the right size.  I sealed off the other side of the model to create a solid shape.  I added wheel arches to the front of the model, the cover on the back wheels and the tail fins while using the spline tool. I used basic geometry such as oblongs and cylinders to create the hood ornament; a hammer.  When I made the wheels I created a small, narrow cylinder and divided it into segments in order to make a realistic looking wheel, I didn't follow this up because this would have added unnecessary polygons. I proceeded to unwrap the model, this proved to be quite a challenge because of the amount of polygons and shapes.  I had to find some way of fitting all of these pieces into a small square and I found a solution.  Since there were multiple versions of the same part; such as wheels, wheel arches, tailfins and a few others I decided to place them on top of each other.  This freed up an exponential amount of space.  Finding textures for the car was a very frustrating process because there weren't many textures to match the bodywork of my car and finding the parts separately was proving to be more trouble than it was worth.  I ended up resorting to painting the windows and headlights myself using the paint brush tool in Photoshop.  Despite all the hiccups I am very pleased with my work.  I think next time I should try and base the car off a real life model because the texturing process was a real pain as it required me to find the exact part of another car and try to piece it all together.  It was hard trying to find a picture taken at exactly the right angle.


3D model evaluation: Lamp post

To create the lamppost I first made a cylinder shape from the geometry tab in order to form the base of the lamp.  I then used the bevel tool to pull the top of the cylinder inwards.  Afterwards I made another cylinder for the pole and two more for the lamp cap and the lamp base.  I made one more cylinder for the cage where the light resides.  I used the lattice tool to form the correct shape.  I then made panes of glass by using the plane shapes which I then moved into place and added a glass texture onto them.  I used the UVW unwrap tool to prepare the model for texturing.  It was a challenge trying to figure out the best way to unwrap the lattice because it wasn't a very conventional shape.  I used varying conditions of metal for the texture, especially for the top as it looked more rain damaged.  I am happy with the outcome but i would have liked to have added more shapes to it like a horizontal pole through the centre one.  I would've also liked to include a light fixture inside the main cage of the lamppost.


3D model evaluation: Gate

I started by creating an oblong shape by using the box tool in the geometry window.  I then added vertical sections and two horizontal ones to the shape in order for the next step.  I highlighted an edge and then pulled it upwards to add a triangle pinnacle to my model.  Afterwards I added some vertical segments to the model in order to create a grid; I did this to make it look like a steel with corrugated metal.  Once the modelling process was complete I then unwrapped the model for texturing.  I found some very rusty metal textures which I thought would tie in very well with my rustic environment.  I also created a bump map by changing the texture colour to greyscale; this helps to bring out the structural impurities.  I am very satisfied with the final result but I would have liked to add more vibrant textures to the gate but my own skill in creating home-made textures is very limited.